Saturday, November 20, 2010

Mini Mansion Built from Scratch


It is possible to make your own large dollhouse on a budget.   Just take a simple box shape, add a lot of creativity, and turn it into a mini mansion.   Take a look at this Mini Mansion project.   Click the buttons at top of Mini Mansion page for DETAILS and FLOORPLAN.


Saturday, November 13, 2010

How I Made the Bathroom Fixtures- Toilet

Bathroom, finished

In the $5 dollhouse, everything in the bathroom was made from scrap wood and found items.  This dollhouse is for a 4 year old child with even younger siblings, so everything has to be sturdy and kid-safe.  No tiny or dainty, fragile fixtures here!  ;-)   See previous posts for how to make flooring, sink and tub.   Floor tiles, towels and door between bathroom and bedroom were all printed out and glued on.  The baseboard trim and window trim is cut from white craft foam.

The toilet was a challenge.   How do you make a modern toilet from a piece of wood, short of being a master carver?   I guess I could have modeled it out of air-dry or polymer clay, but I didn't think of that until after I finished making the one shown below.  But this came out OK and was quick and easy.  Next time I'll do better.   Maybe I'll make a new one out of clay when they're a little older.  *G*


The bottom, base, of the toilet is a miniature wood flower pot. It was just the right scale!  The toilet llid is a ready-made wood disk.  The tank is a small rectangular block of basswood.   I drilled a small hole on one side of flower pot and a matching hole in bottom of tank block.   A sturdy wire was threaded thru the holes and bent to connect the 2 parts.  Before glueing, the bendy piece of a flex-straw was added to cover the wire.   Everything was painted white and a flush handle was painted on.

How to attach the lid was a challenge.   I thought it might be fun if the kids could lift the lid....but that wouldn't happen if it was glued on.    After attempting a few different things, I ended up using a couple of pieces of scrap magnetic vinyl.   One piece was glued to flower pot as the toilet seat, the other piece was the hinge and also glued to the lid.  To make the hinge work, the wire that connects the base to the tank was passed thru the hinge before straw was added.    Now the lid open and closes magnetically.    How fun is that!  LOL

Stay tuned ....almost finished with this project!

Wednesday, November 10, 2010

How I Made the Bathroom Fixtures- Tub

Finished Bathroom
The bathroom is now finished.   All fixtures were made from wood.   The baseboard molding and the  molding around the door and window is white fun foam.   Making the flooring and sink was discussed in a previous post.    The door between the bathroom and bedroom is a printable.

The tub is a block of wood, about 1.5"x2"x5".  The interior of tub was routed out (by a friend...not me) and all edges were softly rounded by sanding.   The first photo below shows tub after being primed.  Hot and cold faucet knobs (child safe) were made by embedding dowels at end of tub.


Tub was painted white and faucets were painted metallic silver.  After paint dried, both the tub and sink|countertop were sprayed with a high gloss finish.   


Tuesday, November 2, 2010

How I Made the Bathroom Fixtures-Sink

Finished Bathroom

The 2 main goals of this dollhouse project is to spend as little as possible and to make it child safe....all while making it fun and realistic, of course!  The $5 dollhouse is a gift for 4-year old granddaughter, but I have to keep in mind that she has a couple of younger sisters who will undoubtedly handle the furnishings.  So "clunky and sturdy" is the name of the game for the bathroom fixtures.    If that's not a concern for your dollhouse, you might like one of these sets, all designed for children.
This Melissa & Doug Bathroom Furniture Set  is recommended for ages 6-10.  I think it's scaled nicely enough for an adults hobby!


Plan Toys has a couple of wooden bathroom sets suitable for ages 3-8.

Fisher Price has a plastic bathroom set.   Recommended for ages 3-7.


Although there's quite a few bathroom sets available to purchase in 1" scale,  most of them are either too fragile for my younger grandchildren or too expensive for child's play.....so I opted to make some out of wood.

Bathroom sink-unpainted
The photo above is the unpainted rough beginnings of the sink.    It is simply a block of wood about  3"x3" and 1.5" thick.  I added a couple rectangles of basswood to represent doors and gouged out a round "sink" in the countertop.   The faucets are 2 small pieces of dowel inserted in wood next to sink.    It looks real enough once painted.   Let the kids imagination fill in the blanks!   LOL     

Bath sink and cabinet
The photo above shows the finished sink along with a wall cabinet and some faux towels.   The faucets were painted silver and the countertop painted pink with a multi-color splatter technique (used an old toothbrush to splatter various colors).   Both the sink and countertop were top coated with a high gloss finish to add a little to the realism.   

The wall cabinet was rescued from the original dollhouse.   It was missing a door!   Made a new door from basswood and painted it all white.   I had a small piece of very shiny silver vinyl in my stash of stuff and used that for "mirrors".     The towels hanging on the wall are a printable set of towels glued on.

Oh...and the cabinet doors open and close with hinges made from tiny nails.   A nail is inserted in top of cabinet, going all the way thru and nailed into the top of door near edge.   Another nail is goes thru bottom of cabinet into bottom of door.  Works swell and is completely embedded in wood so should be safe.

In the above photo you can also see the finish molding around the window and the baseboard.   All moldings were made with white "fun foam" cut to size.  Much easier than cutting & painting wood and it looks surprisingly nice!

Next we'll make the tub!


Sunday, October 31, 2010

Bathroom Finishing

Bathroom-before flooring added
Not much to show in this small bathroom.   This room was papered with real-life wallpaper that I just happened to have a large enough sized sample.  Very, very little was left over! It was close!  LOL   The scale of the pink & blue print was just right for the dollhouse and also goes nicely with the pink bedroom!

Bathroom with printable flooring
The bathroom floor is a printable tile design that I made to match pink in wallpaper.   I covered the ink-jet printout with clear vinyl shelf paper ("Contact" paper) to give it a tile-look sheen.     Before cutting out the flooring from printout, I made a paper pattern using brown craft paper. 
Use your graphics program to alter color of this
pattern to suit your own room and then fill a full sheet of paper to print.
To make the pattern:  Cut a piece of craft paper a little larger than the estimated size of room and place it on floor.   Then take a stylus (or a not-too-sharp pencil) and emboss or rub a mark all around the edges where floor meets wall.   Before removing paper from room, mark the paper with an arrow to indicate back wall, so you'll know which end is which when you remove paper.  Believe me, top-bottom-front-back CAN get mixed up!!  Next, cut out the pattern based on that mark and fit it into the room.   Any places that don't fit exactly can be patched with a scrap of paper taped onto pattern and re-cut.    Make sure you have a well-fitting pattern before cutting your flooring.    This is especially important if you've purchased a $10 pack of dollhouse flooring and don't want any mistakes!  *G*

Also, remember to place pattern on flooring with the correct side UP.   Turn your flooring material over and trace your pattern onto the back side of your flooring .....making sure the pattern is also upside down.   I'll be glad to answer any questions about making your own tile pattern...just ask!

Wednesday, October 27, 2010

Decorating the Playroom


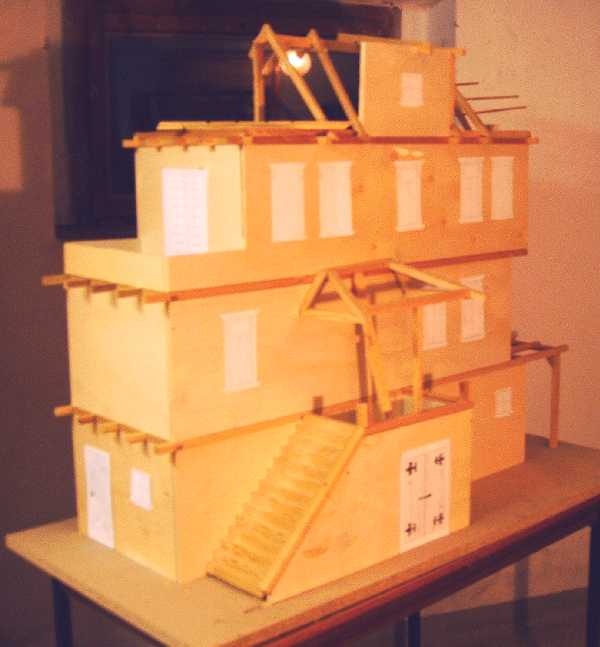
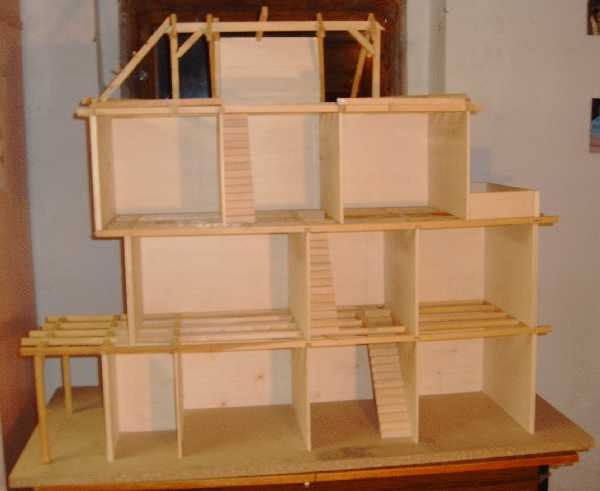
The top floor of the $5 dollhouse has height limitations due to the gable roof.  I decided to decorate this as a generic playroom so granddaughter could use it in many different ways, not just as bedroom.    This room was decorated at practically no cost.   I also made some furnishings for it at little cost, which I'll show later.

The floor in this room of the original $5 dollhouse was in very bad shape with old glue and other things stuck to it. I could have covered it in carpet, I guess, but I wanted a wood floor here. 

Instead of trying to sand and fix the original floor, I used a piece of thin plywood to cover up the original floor. Before giving it an acrylic finish, I used a pencil to draw lines to represent the gap between floorboards.   Photo here shows vertical lines added.   Randomly spaced horizontal lines would be drawn to represent the length of each board.  You could also make the width of each board more random than I did.   Additionally, if you like, you could add a couple of dots at end of each board to represent the nail heads in a more rustic floor.

Once the wood is coated with an acrylic finish, the pencil lines & indentations make it look like real flooring.   Be sure to use a ruler and measure for accurate straight lines!  ;-)

Tip:  I made a paper pattern first before cutting plywood for floor.   This gives exact dimensions, especially when room isn't perfectly square.   You could use a brown paper grocery bag to make pattern.

I didn't glue this floor down.  It fit well enough where glue wasn't needed.   Also, by not being glued down the wood floor could expand and contract with the humidity and hopefully,  avoid any problems.

Because the floor wasn't glued down, I removed it to paint and wallpaper.

I found a 'Dora the Explorer' wallpaper border printable that was the exact same height as the short wall in the room.  I think I found it at Jennifer's Printables ...I'll have to check and get back to you on that!
 All kids love Dora, so I settled on that.   The walls were painted a corresponding blue using Americana Craft Paint. It required a couple of coats!

Photo shows close-up of wallpaper border
(and also some of  the bumps and gunk on the original floor!)
I stumbled upon a printable of a small hexagon window and thought it would fit well on the back wall.   After I printed out the window, it was sprayed with a fixative so ink wouldn't bleed when I glued it.   Also, it was glued to a piece of cardboard first, just to give it a little dimension.  Finished room is below.


Saturday, October 16, 2010

Another Michaels Hutch-Bash


This time one of those great $1 hutches has been turned into a laundry room wall cabinet by Doreen at Doreen's Miniature Projects.  Finished cabinet is shown above and the original hutch shown below.


This is how it looks in the finished laundry room.   Well done Doreen!   Visit her blog to read more about this Sewing and Laundry Room Project.


Thursday, October 14, 2010

Travel Trailer Project


Today I came across this 'work in progress' at Jenn's Mini World that I just had to share!   She has step-by-step photos showing how she created this mini travel trailer following instructions from Miniature Collector magazine.   I love those 'romantic' old trailers and always wanted one myself, but maybe I can make one in miniature! ;-)     This is a half-inch scale project.

Go here for Part One for lots of pics, plus some tips for making the project
Part Two  includes Helpful Hints (Or, what I learned the hard way)
Part 2.5   Note about error in design
Part 3 and Finish   Showing finished interior & accessories


Tuesday, October 12, 2010

How Dollhouse Kits Are Made

Video tour of factory at "Real Good Toys", makers of some very fine dollhouse kits.  Video shows assembly of a deluxe dollhouse and the process and machinery that makes all those detailed parts!

Saturday, October 9, 2010

Decorating the Pink Bedroom


For the pink bedroom I will be using a variety of materials.   The pink-striped paper shown in the photo above is 12"x12" scrapbooking paper purchased on sale.    The purple and pink pattern is a printable butterfly wallpaper border.    The pink fabric shown above is a felt square I originally planned to use for carpeting.   It was the right color but I also thought it was a little thin for carpeting.   When I saw some plush fleece on sale,  I thought it would work much better as it was thicker, with more pile.   You can see it in finished room below.

The first step was painting the room bubblegum pink.  I just used craft paint for this.   One coat was enough because the walls had been primed first.


Next I used thinned Elmer's Glue as wallpaper paste to attach the striped scrapbook paper as wainscoting.   By only covering half the wall, one sheet was enough for the whole room.


After wallpaper dried, I added the border.   Multiple copies of the border were printed out as a full page (using good quality paper) and sprayed with a matte sealer before using (otherwise the ink may bleed).    Then borders were carefully cut out and glued to top of wainscoting, which, as planned, lined up with bottom of window.   No cutting around window was needed.

For the carpet, I made a paper pattern first, to make sure I got the size correct the first time.    Because this is a recycled dollhouse, I suspected all walls weren't perfectly square....and they weren't!  The center wall was a bit off-square, but not too noticeable to be concerned with.    Below is the finished pink bedroom.


The carpet was glued down, but only a few spots of glue in corners and along front edge.   I used fabric glue for this because other glues might bleed through the carpet and leave a dark spot!

I didn't make any curtains for the windows.    I may do that later....or just wait until the kids get older before adding those kind of details.    So far, so good!  ;-)    Next we'll tackle the bathroom.

Wednesday, October 6, 2010

How to Shingle a Dollhouse


I painted faux shingles on the $5 dollhouse, but if you want to put real shingles on your dollhouse you must see the Shingling Guide at More Minis.   Great ideas for getting it right on the first try!

Friday, October 1, 2010

Painted Landscaping

Onlay attached to right side

The painted Masonite cutout (onlay) to represent landscaping is done and attached to house!   Not the world's greatest paint job... (I'm running short on time to finish!! ....*G*....no time to fuss!)....but it's suppose to be cute and cartoon-y anyway, not realistic.    The idea was to add some bright colors and things that the kids would enjoy looking at....but still keep it simple.    (See previous post to see steps taken to cutout before painting.)


Onlay glued to left side

The birdhouses are added on as an additional layer of wood for a little dimension.   I also added some window shutters.   Another excuse for adding spots of color.  Nothing complicated about the shutters, just an easy-to-make rectangle of thin wood with a painted heart to dress it up.

That pretty well finishes up what I plan to do with exterior!

Sunday, September 26, 2010

Michaels Hutch Bash

Some of the different styles available
Michaels Crafts sells these miniature hutches made from unfinished wood for only $1.oo!!!.  They are pretty close to 1:12 scale.   There's quite a few different designs and most have working doors and drawers.   They are very nice as is...but modifying these inexpensive little hutches into something else has become quite popular.   The hutches are easy to take apart and "kitbash" the pieces into something new!  The price is so low, you can buy a bunch....so you won't feel guilty destroying a perfectly fine hutch!  LOL

Deconstruction!
I've seen quite a few tutorials for converting these hutches into different pieces of furniture.  I've collected a few links and will post them all as I find them on a special page for Michaels Hutch Bash (see menu above).     Here's a few to start:

Fireplace Hearth
Step by step instructions
Hutch used for fireplace is shown upside-down!


Friday, September 24, 2010

Decorating With Shrubs and Trees


For this low-cost, kid-friendly dollhouse, I decided to paint shrubs, trees and other plantings onto side of house instead of using any easily damaged and potentially unsafe materials.   To make painting easier on myself (and also give it a little dimension), I created an "onlay" for the shrubs out of some scrap Masonite.
Landscaping started out looking like this:


Using some basic tole painting techniques....we have created a nice row of trees and shrubs to apply to each side of the house.  Basecoat with medium foliage green.  Imagine some shrub shapes and, using a stippling motion,  highlight one side of with a light foliage green and the other side with a deep green.   I made no attempt at realistic shapes......just ellipses...puffy ball shapes!


This decorative onlay is not quite done.   I plan on adding some flowers and birdhouses for added color.  I promise I will show you the finished photos soon.  I also plan on adding some shutters to the windows to dress things up a bit more!   The black and white checks are there just because I like checks and it also adds a little whimsey.  ;-) 

Tip:   Notice that the red color of the house is painted between the branches of the tree.   That makes cutting out the onlay shape a whole bunch easier!  No tiny branches to cut!   Once it's applied to house, you'll never notice!


Wednesday, September 22, 2010

Faux-painted Dollhouse Shingles


Gosh!   I can't believe a week has gone by already and I haven't updated the tale of the roof re-do on the dollhouse!  I've been so busy working on the house, I just haven't had time to talk about it!   Sorry! ;-)

If you've been following along from the start, you know that my first attempt at applying a printable pattern of asphalt shingles ran into a number of problems (mostly with printing).    After a few frustrating attempts I tore the glued on paper "roofing" off and started over by painting the roof a basecoat of medium brown.   This has to be a kid-friendly roof treatment...so, no shingles (until child gets older).  The plan is to paint some faux asphalt shingles for the dollhouse!

Wednesday, September 15, 2010

New Plan for Roof


Because I had so much trouble with the printables for this roof (see previous post), I soaked all the paper and removed it.   After a bit of glue removal, it's ready to start over.   btw...Removing the printable paper and glue wasn't too bad a job at all...went fairly easy.    But now I've painted the roof a medium brown as a basecoat for the new painted faux-shingles!    I'll share some step-by-step photos of the faux painting next!

There's a lot of inexpensive, recycled things that can be used to shingle a dollhouse, but this dollhouse is being designed for a child, so I don't want to use anything that can break (sharp edges) or fall off.   I've seen shingles made of sandpaper, egg carton cardboard, real shingles (cut to size), pine cone "tiles" ....many other things.   Leave a comment if you have a shingle idea to add to list!

Tuesday, September 14, 2010

Roofing is Not Going Well

Printable shingle pattern, partially finished.
One thing after another went wrong when printing out the pattern for the printable roof shingles.   It had nothing to do with pattern.   First thing that happened is I ran out of ink in printer!!    Not completely out, but ink was low enough that when I printed 3 more sheets of the shingle pattern, it came out a noticeably different color than the sheets that are already glued to roof..  Well, that just won't do!

I live in a small town and can't buy any ink here...so it's a trip into the city or wait for mail order.   So I went into city and got more ink.   I also bought some more matte spray to coat the printed pages.

That went wrong too.    I got more sheets of the shingle pattern printed out OK.    Sprayed them with a sealer  so ink wouldn't run....let that dry.   Well, I must have been using wrong stuff, because, when the finish dried, it wasn't completely clear.    It left a whitish, powdery-looking residue.  Very noticeable.  

At that point I lost my patience!     I had already used up a lot of ink printing out a lot of pages and didn't want to experiment any more!    My word of advice!   Do some test prints.   Make sure you have plenty of ink in printer....and spray a sample with your clear coat/sealer spray before using it on your final product.  

My decision was to START OVER and paint faux roof shingles instead of using printables for roofing.   I haven't given up on using printables, I just won't use them on the roof.    So guess what the next step is, yep!  I have to pull off the shingles I've already glued on.   That may take a while!!!

Removing printed shingles from roof!

Tip:   If you have to do this....wet the paper well.  It will remove easier.  If you have some fabric softener, dilute it in water and try it.   It may soften glue faster.  (I had used diluted Elmer's White Glue as sort of a wallpaper paste.)

Available at Amazon